Game Overview
Hand of Fate: Ordeals is a
deck-building game where Adventurers fight monsters and acquire treasures on their quest to
obtain the most Fame.
Each Adventurer starts with a basic set of cards that
allows them to move and fight. Better cards will be acquired throughout the game.
Each turn, a player will play cards in any order from their
hand. When their Player deck is empty, they will shuffle their discard pile to form a new Player
deck. In this way, any new cards that were acquired and placed directly into the discard pile
are incorporated into the Player deck.
Players will move around the board, revealing and
interacting with Encounter cards, until they defeat the Royalty of that level, starting with the
Jack on level 1. This will cause the board to advance to a new level and a new set of Encounter
cards.
Defeat the Queen of level 2, and finally the King of level
3 to finish the game. The player who has gained the most Fame will be crowned “The Hero”.
The rules in this section describe
the Competitive Mode of the game. You will need to read the rules for
Competitive Mode in order to play all other game modes.
Starting Player
Before the game begins, choose a player to start the game.
We recommend the person who has the most experience with the game.
A Game Round
A round proceeds in clockwise order. Each player will take
a full turn, going through each of the turn steps, before passing their turn to the next
player.
Rounds continue until the end of game is triggered by
either a player defeating the King Royalty or players collectively dying too many times.
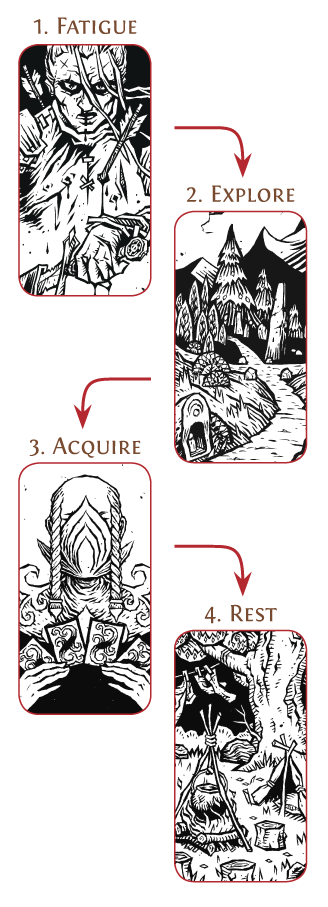
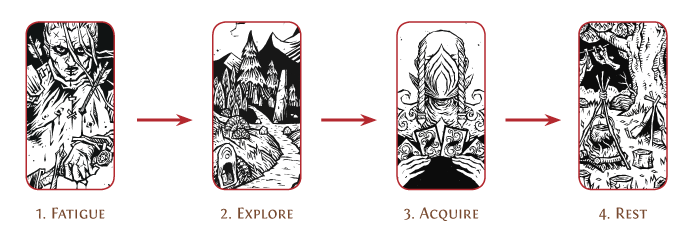
A Player’s Turn
A player’s turn consists of 4 steps that must be taken in
order:
Fatigue
This is the upkeep step where a player must decide if they want to
spend resources in order to maintain battle-readiness.
Explore
This is the adventuring step where a player
interacts with the game world, engages in combat and explores new locations.
Acquire
This is the deck-building step where a player acquires new cards that
improve their Adventurer.
Rest
This is the clean-up step where a player places both played and unplayed cards
into their discard pile and draws a fresh hand of 5 cards.
Playing Cards
You may play cards from your hand at any time during your
turn while outside of a Combat or Ambush Encounter.
The types of cards you will draw and play from your deck
are Action and Attack cards, collectively called Skill cards.
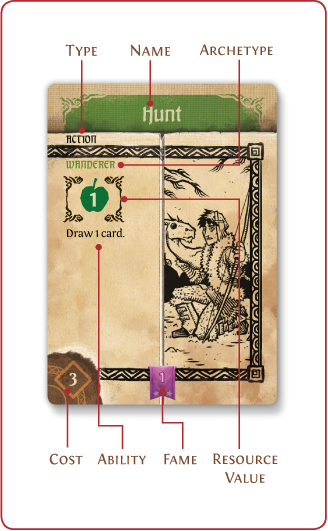
Action Cards
Action cards provide resources and special abilities that
take immediate effect when played. Played Action cards are discarded at the end of a player’s
turn.
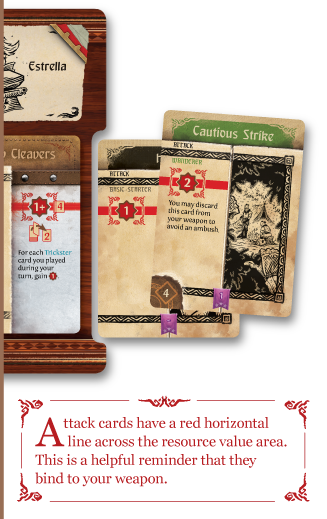
Attack Cards
Attack cards provide resources and abilities that usually
take effect during combat. Unlike Action cards, Attack cards usually stay near your Player Board
until they are used.
Cards that are not played are
discarded at the end of the turn before a new hand of 5 cards is drawn.
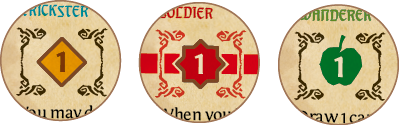
Resources
During your journey, you will gain various resources. These
are essential for moving, fighting, improving your Adventurer, and achieving victory.
Effort (![]() )
)
Effort may be gained from several sources during your turn.
Effort may be used to acquire cards from the Dealer’s Row by spending an amount of Effort equal
to a card’s cost. Certain abilities are activated by spending Effort. You may spend Effort at
any time during your turn, across multiple actions or cards.
Effort you obtain does not need to be used immediately, and
may be kept for use later in the turn. But beware! Any Effort you have not spent by the end of
your turn is lost.
Power (![]() )
)
Power represents the overall strength of an Attack card,
weapon, or enemy. It is an important part of combat. You can gather Power prior to combat by
binding Attack cards to your weapon.
Food (![]() )
)
Food provides you with Food tokens equal to the value indicated. Any Food
tokens gained are taken from the general supply and placed in the Pouch on your Player Board. Food
is an important resource that you must spend if you wish to move your character from one Encounter
to another. Food can also be used for other special effects through combat, Encounters and Action
cards.
Token Shards (![]() )
)
Token Shards are a reward granted by Kallas for defeating
enemies and visiting Encounters. The primary purpose of Token Shards is to grant you the ability
to earn Relics, which are ancient artefacts that hold great power. Any Token Shards you earn are
placed in the pouch on your Player Board.
Fame (![]() )
)
Fame is the ultimate prize. Each decision you make, every
additional skill and item you acquire, and every battle you win or lose, will determine whether
your Fame rises or falls.
At the end of the game, your Fame is totalled by combining
the value on the Fame Track with the Fame values of all cards in your Player deck and on your
Player Board. The player with the most Fame is the winner.
Note: Players do not have any
resources at the start of the game. In order to gain resources, players must play cards that
grant them.
1. Fatigue
During the Fatigue step, you may spend ![]() for each Attack card currently bound to your weapon. If
you do not spend the required
for each Attack card currently bound to your weapon. If
you do not spend the required ![]() for each card, you must
discard all Attack cards bound to your weapon.
for each card, you must
discard all Attack cards bound to your weapon.
Fatigue Example: If a player has 3
Attack cards bound to their weapon at the start of their turn, they must spend ![]() to keep all three Attack cards bound. A player cannot
spend any amount less than
to keep all three Attack cards bound. A player cannot
spend any amount less than ![]() as it is an “all or
nothing” affair.
as it is an “all or
nothing” affair.
2. Explore
During the Explore step, you may move as many times as you like until you
activate an Encounter. You may move in order to reveal new Encounters, revisit old Encounters, and
ultimately hunt down the Royalty in the current level.
This step is optional and you may choose not to move or to activate any
Encounters.
A) Moving
In order to move from one Encounter to another, spend ![]() by returning a Food token to the general supply. You
may then move to any orthogonally adjacent Encounter. Diagonal movement is NOT allowed.
by returning a Food token to the general supply. You
may then move to any orthogonally adjacent Encounter. Diagonal movement is NOT allowed.
If you have no ![]() and wish to move, you may spend 1
and wish to move, you may spend 1 ![]() per
move instead.
per
move instead.
As long as you have the necessary resource, you may
continue to move until you activate an Encounter, or have revealed an Ambush Encounter.
If you move to an Encounter that is face-down, you must
immediately reveal it by turning it face-up. After revealing an Encounter, immediately place a
number of Usage cubes on the Encounter according to its Usage value.
B) Activating an
Encounter
To activate the Encounter you are on, remove 1 Usage cube
and resolve the ability of the Encounter.
If an Encounter has a Usage value but no remaining Usage
cubes, it may no longer be activated.
An Encounter without any Usage value has no activation
limit and can be used any number of times.
You may only activate one Encounter per turn. You may
choose not to activate any Encounter, as long as you do not reveal an Ambush.
If you have revealed an Ambush Encounter during your
Explore step, this Encounter is activated immediately and your Strike
Bonus will be reduced to a value of 1 (See p. 18, “Strike
Bonus”).
3. Acquire
Acquiring Skills and Equipment is the primary way to improve your Adventurer.
It is the key to survival and defeating the Royalties on each level.
After completing (or skipping) the Explore step, you may spend any unspent
Effort you have generated this turn to acquire new cards from the Dealer’s Row.
While there is no limit to how many cards you may acquire in a turn, some
Encounters restrict the types of cards you may acquire.
Cards that you acquire go into one of two different areas, depending on their
type.
Skill Cards
Action and Attack cards are collectively called Skill
cards. When acquired, they go immediately into your discard pile.
Equipment Cards
Equipment cards (including Relics) go directly onto your
Player Board, covering the appropriate Equipment slot. If there is another Equipment card
occupying the same slot, you must first stash the item already equipped (See p. 12, “Stashing
Equipment”).
4. Rest
Place all cards in your played area, as well as any cards remaining in your
hand, into your discard pile.
Draw a new hand of 5 cards from your Player deck. If there
are not enough cards in your Player deck, draw as many as you can until the pile is depleted,
shuffle your discard pile to form a new face-down deck, and continue drawing.
Play then passes to the next player in clockwise
order.
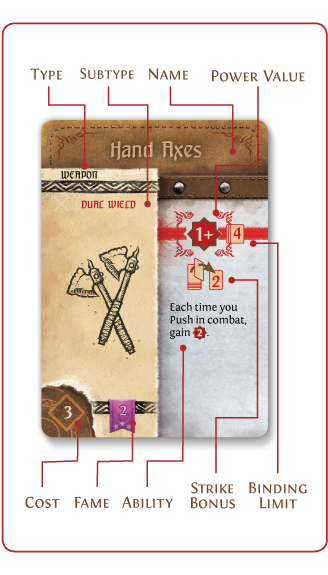
The Skill cards in your Player deck determine the variety
and strength of your Adventurer’s abilities.
Each Skill card has an archetype, an ability, and a
resource value, whether that resource is Effort ![]() ,
Power
,
Power ![]() , or Food
, or Food ![]() .
.
![]()
There are two types of Skill cards:
Action Cards
Action cards play a central role in helping you survive. Most Action
cards have an Effort value (![]() ), which is used to acquire
more cards. Action cards may also provide Food and/or activate special abilities. When you play an
Action card, resolve its ability immediately.
), which is used to acquire
more cards. Action cards may also provide Food and/or activate special abilities. When you play an
Action card, resolve its ability immediately.
Attack Cards
Attack cards have a Power value (![]() ).
Attack cards are bound to your weapon in order to increase your Power in combat. Power you have
gathered by binding cards to your weapon is assigned to defeat
enemies during combat.
).
Attack cards are bound to your weapon in order to increase your Power in combat. Power you have
gathered by binding cards to your weapon is assigned to defeat
enemies during combat.
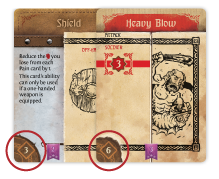
Binding Attack Cards
To bind an Attack card to your weapon, place the card into the notch beside
your weapon on your Player Board. While binding, you cannot exceed your weapon’s Binding Limit (See
p. 13, “Binding Limit”).
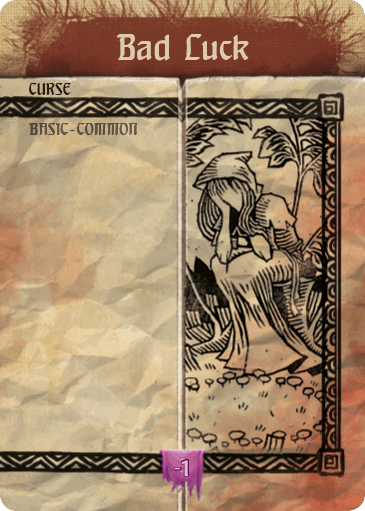
Curse Cards
As you fight enemies and face the many challenges Kallas has arranged, you may
find yourself burdened with curses.
Curse cards do not provide any Resource value and will
hinder your progress by taking up valuable space in your deck.
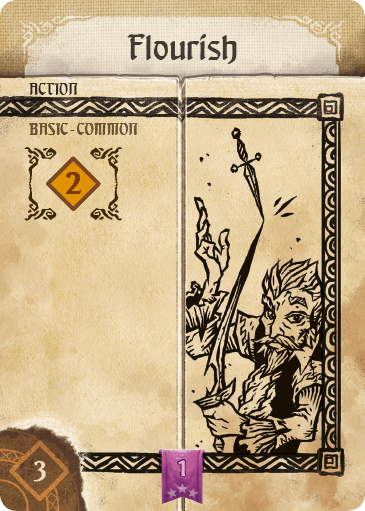
Flourish Cards
Flourish cards represent your most basic form of exertion
during the game.
They are a common card and are located in the Flourish deck on the Central
Board; you may acquire Flourish cards from any Encounter space during the Acquire step of your turn.
When an Equipment card is acquired, place it directly onto the Equipment area
of your Player Board. These cards remain on your Player Board until destroyed through some game
effect or until they are replaced.
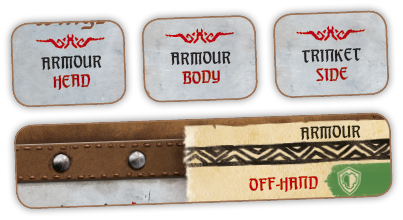
Equipment is divided into three main types: armour, weapon,
and trinket. Additionally, Equipment cards must be equipped to their appropriate slots on the
Player Board: head, body, side, weapon, or off-hand.
Slot Placement
Equipment cards are slotted on designated areas of the
Player Board. These slots are positioned so that cards will overlap each other yet leave
important card text unobstructed.
When you acquire a weapon, simply cover the default weapon
printed on your Player Board with the new weapon card.
Stashing Equipment
If an Equipment card would be placed on a slot that is
already occupied by an existing Equipment card, you must stash the existing Equipment. To do
this, destroy the Equipment card you are
replacing and score Fame equal to its Fame value. Then place the new Equipment in its
place.
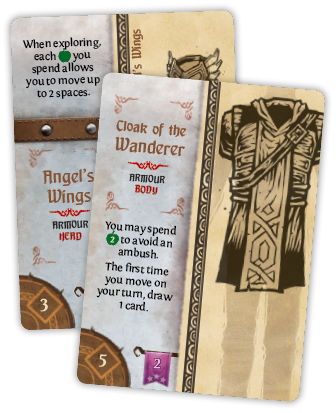
Armour
Armour serves to protect you from the twists and turns of
fate. Whether armour is equipped to your head, body, or off-hand, it serves its purpose by
providing you with various special abilities.
Trinket
Trinkets are typically smaller items and charms which endow
you with a variety of unique abilities.
Off-hand Equipment
Off-hand items are items that you’re able to quickly use
with a spare hand. Off-hand equipment can be used with any weapon type, not just one-handed weapons, unless otherwise specified.
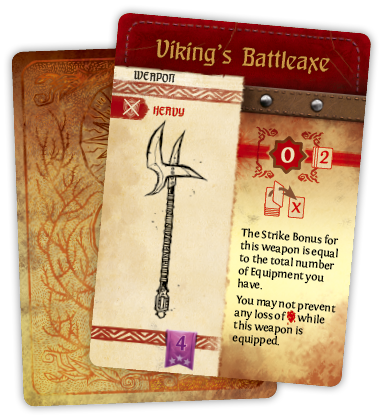
Weapon
You will start the game with a Rusty Axe. You may replace it as soon as you’re
able to acquire a new weapon.
Each weapon has a Power Value, Binding Limit, and Strike
Bonus. Some weapons will also have an ability that only activates during a Combat or Ambush
Encounter.
There are three types of weapons:
One-Handed weapons are balanced and
allow you to use a shield. Great for those who want to play it safe.
Dual Wield weapons are
fast and grant a high Binding Limit at the cost of a low Strike Bonus. Ideal for those who want to
plan their moves in advance.
Heavy weapons require both hands to
heft. They offer a high Strike Bonus at the cost of a low Binding Limit. Best for those who want to
charge headlong into battle.
Relics
Relics are rare and powerful artefacts that may take the form of any of the
three Equipment card types. Relics follow the same slot placement rule as Equipment.
There are several opportunities to acquire Relics, such as
when you have activated the Demon Trader Encounter or are looting a Royalty.
Once the Relic has been placed on the Player Board, it
cannot be removed unless another Relic belonging to the same slot is acquired (which would stash
the old Relic). Therefore, you cannot acquire an Equipment card for any slot occupied by a
Relic.
Important: Relics can never be
destroyed or discarded by an ability or game effect targeting Equipment.
Power Value
The base damage the weapon will bring to combat. This can
be applied to an enemy only once per Combat Encounter.
Binding Limit
The maximum number of Attack cards you may have bound to
your weapon outside of a Combat Encounter. You may exceed this limit if you bind more cards to
your weapon during combat with your weapon’s Strike Bonus, or through other special
abilities.
Strike Bonus
The number of extra cards you draw from your Player deck
and bind to your weapon at the start of a Combat Encounter. Beware! If you reveal an Ambush
Encounter, your enemies have taken you by surprise, and your Strike Bonus is reduced to
1.
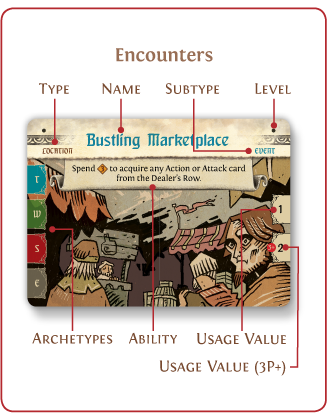
Encounters are the cards that form the map
on the Central Board. Encounter cards (aside from the Town Encounter) start out face-down. When you
move to a face-down Encounter card, you must reveal the Encounter by turning it face-up.
There are three levels of Encounters, one for each of the three Royalties.
Level 1 Encounters are associated with the Jack, level 2 the Queen, and level 3 the King.
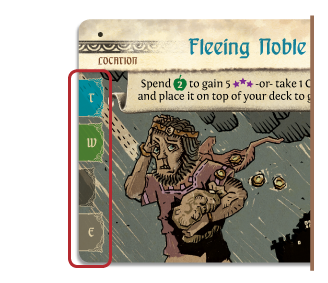
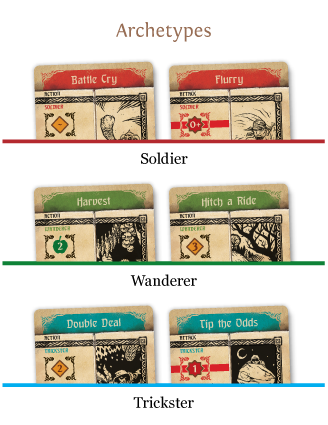
Each Encounter also displays one or more archetypes: Trickster (T), Wanderer (W), and/or Soldier (S).
These indicate the types of Skill cards that may be acquired from the Dealer’s
Row at this Encounter. In addition, an Encounter card may also grant access to Equipment (E) cards.
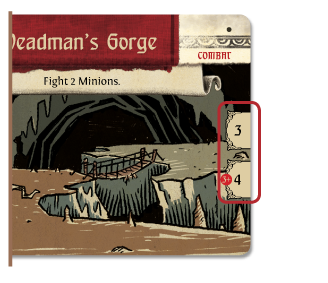
Usage Value
A Usage value indicates how many times an Encounter can be
activated. When an Encounter is revealed, place Usage cubes according to the Usage value.
Some Encounters show more than 1 Usage value. The
subsequent Usage value icons are always coupled with a red numeric symbol, indicating the player
count.
Encounters without any Usage value have no activation limit
and can be used any number of times.
Encounter Types
Location is the most common type of Encounter in the
game.
Boss Encounters will bring you face-to-face with a unique and powerful enemy.
Campaign Encounters are only used
in Campaign Mode (See p. 22, “Campaign Encounters”). Return them to the box when playing in
Competitive Mode.
Encounter Subtypes
Basic Encounter is a subtype that
appears on every level. The Town is the only basic Encounter card in the game. At the start of each
level, all players start on the Town.
Events are the most common
Encounter subtype in the game. If you activate an Event Encounter, simply resolve the text on the
Encounter. Any cost must be paid or the Encounter cannot be activated.
Combat subtypes call upon your
Adventurer to engage in battle. If you activate a Combat Encounter, draw and fight enemies as
instructed by the card.
Ambush behaves like a Combat
subtype with a couple of differences. Any Ambush you reveal when exploring will be activated
immediately. Whenever you are ambushed, your Strike Bonus is reduced to a value of 1.
Once an Ambush Encounter has been revealed and activated a single time, it
acts as an ordinary Combat Encounter. Therefore, if you choose to activate an Ambush Encounter that
has already been activated, your Strike Bonus will be fully available at the start of combat.
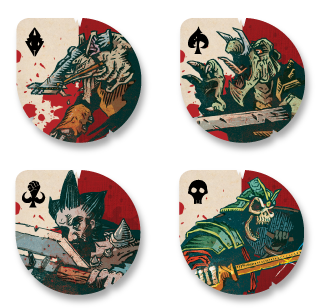
Dust minions are Bandits that roam
the wide ranging deserts. They are weak but have a penchant for stealing.
Plague minions are filthy Ratmen
who feed on scraps and spread illness. Best beware if these enemies outnumber you, as fighting will
become increasingly difficult.
Skulls minions are Undead skeletal
warriors raised from the dead by dark magic and curses.
Scales minions are powerful
Lizardmen. They carry fierce weapons and heavy shields. They will fend off blows so come prepared
for an extended battle.
Enemy Abilities
Enemies may have abilities which allow them to change the
course of combat. These special attributes take effect at the time stated on the card — either
when the enemy is in battle or when it is defeated.
Protection
Protection is a powerful passive defence, common to the
Scales suit.
Protection comes with a numerical value. If an enemy has
Protection 1, the enemy will ignore the first card with 1 or more power assigned to it each round of combat.
If an enemy has Protection 2, the enemy will ignore the first 2 cards, and so on. If you wish to
defeat such an enemy, you will need to assign multiple cards in a single round of combat.
If an enemy with Protection would gain Protection for any
reason, increase their original protection to the sum of those values.
Infected
Infected enemies are covered in filth and disease. Your
endurance is weakened against these opponents, and you will find it harder to push on in fights
(See p. 19, “Push or Flee?”).
Infected enemies will force you to spend additional Food in
order to push during combat. If an Infected enemy is defeated during combat before you push, you
no longer need to spend the additional Food.
Infected comes with a numerical value. If an enemy has
Infected 1, the enemy will cost you 1 additional Food to push against. If an enemy has Infected
2, the enemy will cost 2 more to push against, and so on.
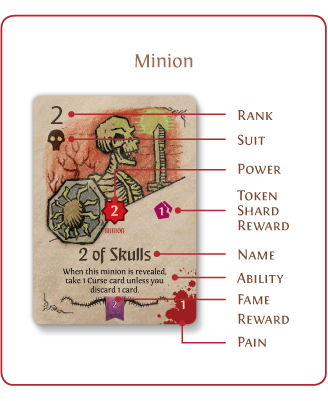
Minions
Minions are the underlings that serve their bosses. They
are what Adventurers typically fight during Combat Encounters. If the Minion deck is ever empty, shuffle the discard
pile and place t face down to form a new deck.
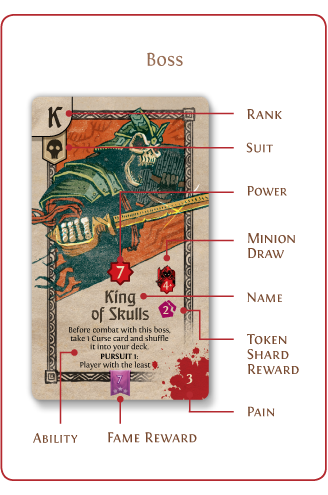
Bosses
Bosses are typically fought at Boss Encounters. They are
powerful enemies who always enter combat with minions at their command.
The value found in the Minion Draw icon indicates the
minimum total Power value of minions that must be drawn for battle. Draw and reveal minions
until their combined Power value is equal to or greater than the Minion Draw value.
For example, if a boss has a Minion Draw value of “4+”, you
must continue to reveal minions from the Minion deck until their combined Power value totals 4
or greater. This could be achieved by drawing a single minion with a Power value of 4 or above,
or one minion of 3 Power combined with a minion of 2 Power for a total of 5, or just four
minions with 1 Power each.
Once you have drawn these minions, the Combat Encounter
resolves in the same way as any other Combat Encounter, with one exception: All minions must
have enough damage assigned to defeat them before you may assign cards to the boss. In other
words, you must defeat all minions before you can defeat the boss.
As with normal combat, you must resolve Pain cards equal to
the boss’ Pain value (as well as that of any remaining minions) if you are unsuccessful
(See p. 20, “Pain”).
If the boss is not defeated, its Encounter remains active
until a player is able to defeat the boss. All minions drawn for the previous combat are
discarded. At the start of the next boss combat, the boss will draw new minions.
A Royalty is a type of Boss. Only Royalty Bosses exist in
the standard edition of the game, but future game expansions may introduce non-Royalty
Bosses.
The Jack ( J )
The Jacks are the weakest of the three Royalty types, but
they remain a force to be reckoned with. When first encountered, a Jack may afflict the players
with a devastating special ability. If you wish to fight the Jack, make sure you are prepared
for the challenge.
The Queen ( Q )
The Queen Royalties are characterized by the Queen’s
Presence, a special ability that affects gameplay as long as that Queen remains in play.
For example, while the Queen of Dust is in play, any player
who reveals a Dust minion during their turn immediately loses 1 Health.
The King ( K )
The Kings are the most difficult Royalties to
defeat.
If you have revealed the King Royalty and are unable to
defeat it, place the King token on the Boss Encounter. In this way, the King’s Boss Encounter
becomes a moving Encounter, which is activated whenever the King token reaches the active
player.
The King token will move at the start of each player’s
Explore step (after the Fatigue step), hunting a player as described by the King’s Pursuit
ability.
Pursuit Ability
Pursuit comes with a numerical value, followed by a
description of the player that the King token will move towards. The numerical value indicates
the number of Encounters the King token will move in pursuit of the player it is seeking.
If two or more players are tied for the Pursuit condition,
the player to the left of the active player must choose which direction the King will
move.
Example: The King of Scales reads: “Pursuit 1:
Player with the most ![]() .”
.”
The King token will move 1 encounter in the direction of the player with
the most Health. If two or more players are tied for “the most Health”, the player to the left of
the active player decides which of the tied players the King pursues.
Engaging the King
If a player wishes to engage the King after the King token
has moved away from its Boss Encounter card, the player must reach the King token itself to
initiate combat.
If you are on an Encounter with the King token, you may
choose to fight the King or to use the Encounter. You may also move past the King on your turn
at no penalty.
If the King ends its move on the same Encounter as the
active player, or begins its Pursuit ability on the same Encounter and does not move, it will
then attack the active player.
When the King attacks a player, that player must choose
either to fight or to retreat from the King.
To fight the king, proceed as you would with any (non-Ambush)
Boss Encounter. Choosing this option counts as activating an Encounter for your turn. You will move
on to your Acquire step after combat.
To retreat from the King, you must resolve a number of Pain cards
equal to the King’s Pain value. If you survive the Pain, you will then be able to continue your turn
as normal, and may even challenge the King as part of your Encounter step.
If the King is not defeated, it remains on its current
Encounter. All minions drawn for the previous combat are discarded. New minions will be drawn at
the start of the next combat with the King.
If the King kills a player, place a Usage cube on the
King’s Boss Encounter card to track the number of players the King has killed. To determine if
the game ends, see p. 20, “Game End”.
Looting a Royalty
Defeating a Royalty completes the current level and
provides players with the opportunity to spend their Token Shards to acquire valuable
cards.
In turn order, starting with the player who defeated the
Royalty, each player must choose to Acquire Relic, Exchange, or Pass:
A) Acquire Relic
Spend Token Shards in order to enter the Relic draw.
Spend ![]() , minus 1
for each other player who has already chosen this option.
, minus 1
for each other player who has already chosen this option.
For example, if you are the first player to choose this
option, spend ![]() . If you are the second player to
choose this option, spend
. If you are the second player to
choose this option, spend ![]() , and so on.
, and so on.
Once all players have made a choice, the first player who
spent Token Shards draws 2 cards from the Relic deck, plus 1 card for each additional player who
spent Token Shards.
The first player then looks at the cards drawn, chooses a
single Relic to keep, and passes the remaining cards to the next player who spent Token Shards.
This action is repeated until all players who have spent Token Shards have chosen a Relic. Place
the remaining Relic on the bottom of the Relic deck.
B) Exchange
Convert your Token Shards into Effort by discarding
all of your Token Shards and gaining ![]() for each Shard discarded.
for each Shard discarded.
Then acquire cards from the Dealer’s Row up to the total
Effort gained, ignoring any Encounter acquisition restrictions. This does not include the Flourish card as is it not
part of Dealer’s Row.
C) Pass
The player may choose to do nothing and pass.
Moving to the Next
Level
After the Royalty has been defeated for this level, the
active player completes their Acquire and Rest steps.
The current level is then replaced with the next. The new
level will include a new Boss Encounter card.
The player who defeated the previous Royalty must set up
the Central Board for the new level by completing the following steps:
- Remove all Encounter cards from the board.
- Place the Town Encounter card on any Encounter space.
Then place all Adventurers back on the Town.
- Draw 6 Encounter cards from the new level’s Encounter
deck, without looking at them, and return the remainder to the box.
- Add the corresponding Royalty Encounter (named “Queen”
or “King”) to these 6 cards and shuffle them. Be sure not to look at the cards.
- Starting adjacent to the Town, place each of the
Encounter cards, face-down, onto the Encounter spaces of the Central Board. You may create any
shape you wish, provided at least one edge of each Encounter card is adjacent to another
Encounter card so that Adventurers are able to travel to each Encounter.
- Discard all cards from the Dealer’s Row, replacing them
with new cards from the top of the Dealer’s deck.
- Finally, turn the Royalty card for the new level
face-up. For example, if the Jack has just been defeated, you will now turn the Queen Royalty
card face-up.
Play then proceeds with the next
player as normal.
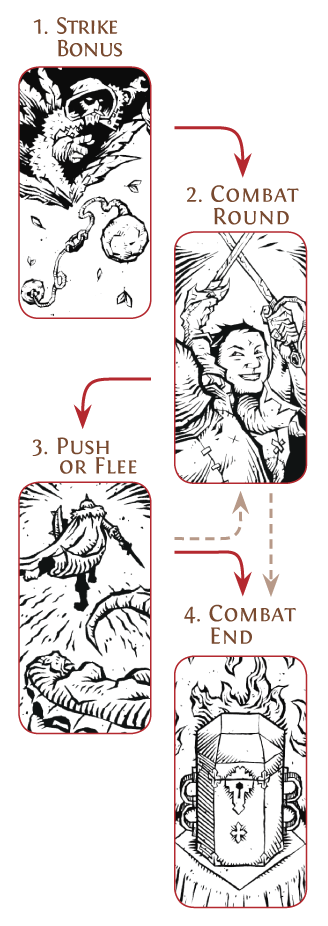
Combat Encounters
When you activate a Combat Encounter, take note of any special
abilities belonging to the Encounter. Then, draw and reveal as many minions as the Encounter
instructs. Resolve any minion abilities that take effect at the start of combat as they are
revealed and then resolve any other card abilities
that refer to the start of combat,
before drawing your Strike Bonus.
A) Draw
If you have not been Ambushed, draw a number of cards equal
to your weapon’s Strike Bonus and bind them to your weapon. Any Action cards you draw must also
be bound as though they were Attack cards.
If you have been Ambushed, your Strike Bonus will be
reduced to a value of 1.
B) Resolve
Resolve the abilities of the drawn cards in any
order.
Effort (![]() ) gained
from cards bound during your Strike Bonus draw step is treated as Power (
) gained
from cards bound during your Strike Bonus draw step is treated as Power (![]() ) instead. If a card’s ability would generate
additional Effort, this extra Effort will also be treated as Power.
) instead. If a card’s ability would generate
additional Effort, this extra Effort will also be treated as Power.
All Power gained this way is added to the card itself.
Abilities that gain other types of resources remain unchanged, this includes abilities that generate food.
After you have finished applying your Strike Bonus and
resolving any abilities, enter the first combat round (step 2).
A) Assign
Assign any combination of cards bound to your weapon with a
total Power value equal to or greater than the Power value of an enemy in order to defeat
them.
Your weapon and certain Equipment can also be assigned to
enemies this way.
Note that each card may only be assigned to one enemy and
can only be assigned once per Combat Encounter.
B) Loot
Gain the rewards from all defeated enemies.
C) Clean-up &
Continue
Discard all defeated enemies and move all assigned cards
(except for your Equipment) to your played area.
If any enemies remain, you must choose either to
Push or to Flee
(step 3). Otherwise, proceed to combat end (step 4).
Push:
- You choose to fight on by spending
![]() , and then resolving 1 Pain card for each enemy
that remains in combat.
, and then resolving 1 Pain card for each enemy
that remains in combat.
- If you survive the Pain (you have at least 1
![]() remaining), draw and bind 1 additional card to your
weapon and start a new combat round (repeat step 2).
remaining), draw and bind 1 additional card to your
weapon and start a new combat round (repeat step 2).
4. Combat End
Discard any remaining enemies and move any unused cards
from your weapon to your played area
(unused cards are any cards bound to
your weapon that were not assigned).
Resolve the rest of the step based on your outcome:
- You won – If no enemies remain before the combat
end step, you are victorious! Receive any rewards earned from the Encounter and proceed to the
Acquire step of your turn.
- You fled – If you flee, you lose in combat but
live to fight another day. Proceed to the Acquire step of your turn.
- You died – If you do not survive the Pain, death
comes for you. However, this is not the end of your journey. Resolve the death sequence (See p.
20, “Death”).
As you struggle to overcome each enemy and obstacle, you
are destined to meet with the wounds and torments they have in store for you.
Both exploration and combat will exact a toll on your
fortitude by causing you to resolve Pain cards. To resolve, draw a Pain card from the Pain deck
and apply its effect. Discard the card afterwards.
When the Pain deck has run out, shuffle the Pain discard
pile in order to form a new Pain deck.
Pain Card Types
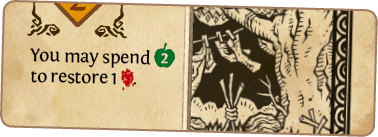
Pain cards range from Health afflictions to famine and
curses. When you lose all your ![]() , you are dead. When
losing
, you are dead. When
losing ![]() , ignore the effect if you have none. When
gaining a Curse card, place it in your discard pile.
, ignore the effect if you have none. When
gaining a Curse card, place it in your discard pile.
![]()
If your Health tracker has reached “0”, you are dead. But
death is not the end. You must continue your struggle.
Upon death, follow the steps
below to resurrect your Adventurer and continue your journey:
Death Sequence
- Discard any unresolved Pain
cards.
- Lose all your Food.
- Destroy a piece of Equipment of your
choice (if you have any).
- Return your Health tracker to
10.
- Place your Adventurer miniature on
the Town Encounter.
- Lose 10 Fame.
- Discard all cards from your hand,
played area and cards bound to your weapon.
- Shuffle your deck and discard pile
together to form a new Player deck.
- Draw a fresh hand of 5 cards.
- Your turn ends.
Were you and your fellow Adventurers triumphant? Did you
best the game of life and death, or did it best you?
The end of the game can be triggered in one of two
ways:
- A player defeats the King.
- The King kills the players a number
of times equal to the player count. It does not matter which players are killed (for
example, in a 3 player game, all 3 players could be killed once, or 1 player could be killed
three times).
When the end of the game has been triggered, you do
not move to a new level. Instead, complete the current round of turns as normal so that
all players have an equal number of turns, then proceed to final scoring.
Final Scoring
To calculate your final score, add the Fame value of each
card from your Player deck, hand, discard pile, and Player Board to your score on the Fame
track. Finally, add 1 Fame for every 3 Token Shards you have.
The winner is the player with the most Fame. In the case of
a tie, the tied player who killed the King wins. If neither of the tied players killed the King,
the tied player with the most Token Shards wins.
If there is a further tie, the tied players must duel: Each
player discards all cards in their hand and bound to their weapon. Then, each player shuffles
all their cards into their deck and draws 5 cards. They may play any of these cards for their
abilities, then bind Attack cards as normal. Each player then applies their Strike Bonus. After
these steps, the player with the greatest amount of Power wins the game.
Rule & Make
Michael “Barantas” McIntyre
Game Design
Allen Chang
Creative Direction
Al Kearney
Product Development
Jason Kotzur
Game Development
David Scott
Public Relations
Ian O’Toole
Art Direction, Illustration & Graphic Design
Greg May
3D Modelling
Matthew Lee
Graphic Design
Darren Atherton
Lead Content Editor
Defiant
Jesse Gillespie
Illustration
Lee May
Project Manager
Morgan Jaffit
Game Direction & Lore
Johnny Chua
3D Character Artist
Shawn Eustace
Art Direction
Liam Hill
Game Lore
Copy Editors
Alan Bic Stroud
Amelia Laughlan
Johan Henriksson
Mikkel Øberg
Pierre-Yves Malisova
Tyson Pink
Playtesters
Brendan Evans
Ashleigh Galvin
Mark Taylor
Steve Deng
Stephen Hurn
Michał “Kapitan Chrum” Murawski
Genesyx
Plus everyone who playtested the game at conventions and other
public events.
Thanks!
A big shout-out to the loved ones who endured the lost hours
while the team worked on the game. We love you.
Thank you, Kickstarter backers for your support and for
believing in the project!
 )
) )
) )
) )
) )
) )
) )
) 
 for each Attack card currently bound to your weapon. If
you do not spend the required
for each Attack card currently bound to your weapon. If
you do not spend the required  to keep all three Attack cards bound. A player cannot
spend any amount less than
to keep all three Attack cards bound. A player cannot
spend any amount less than  by returning a Food token to the general supply. You
may then move to any orthogonally adjacent Encounter. Diagonal movement is NOT allowed.
by returning a Food token to the general supply. You
may then move to any orthogonally adjacent Encounter. Diagonal movement is NOT allowed.
 on the bottom left-hand corner of
 , or Food
  .
.
 ).
Attack cards are bound to your weapon in order to increase your Power in combat. Power you have
gathered by binding cards to your weapon
).
Attack cards are bound to your weapon in order to increase your Power in combat. Power you have
gathered by binding cards to your weapon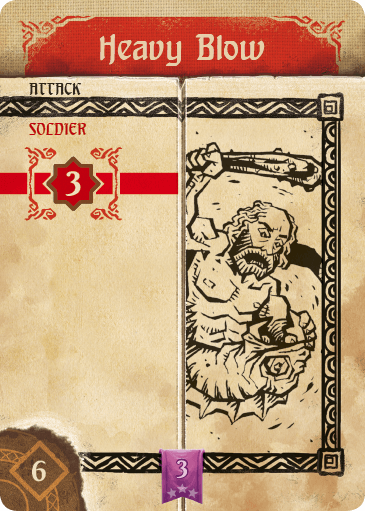
 gained from Action cards is treated as
  .
.
 ), Plague (
 ),
Skulls (
),
Skulls ( ), and Scales (
 ).
).
 , minus 1
for each other player who has already chosen this option.
, minus 1
for each other player who has already chosen this option. , and so on.
 for each Shard discarded.
 .
The second player, Mark, decides to pass. The third player, John, spends
.
The second player, Mark, decides to pass. The third player, John, spends  . The fourth player, Sarah, converts her
  into Effort and acquires 2 cards from the Dealer’s
Row worth
into Effort and acquires 2 cards from the Dealer’s
Row worth  each.
each.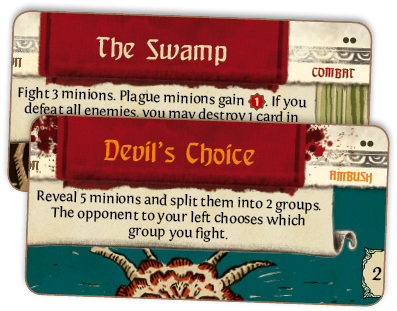
 , and then resolving 1 Pain card for each enemy
that remains in combat.
, and then resolving 1 Pain card for each enemy
that remains in combat.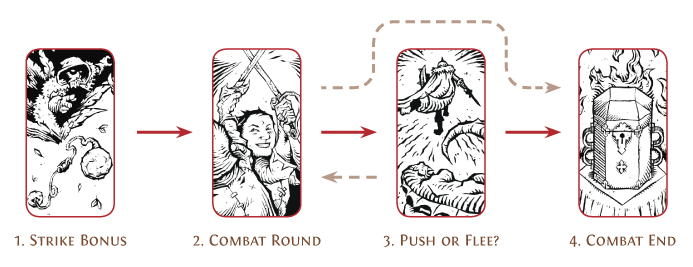
 , ignore the effect if you have none. When
gaining a Curse card, place it in your discard pile.
, ignore the effect if you have none. When
gaining a Curse card, place it in your discard pile.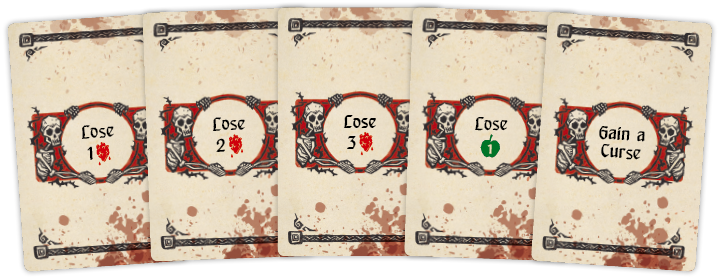
 , used to acquire cards and activate
certain abilities.
, used to acquire cards and activate
certain abilities.
 , that may be spent to move between
Encounters and activate certain abilities.
, that may be spent to move between
Encounters and activate certain abilities.
 .
. , resolving 1 Pain card for each
enemy, then drawing and binding 1 new card to your weapon.
, resolving 1 Pain card for each
enemy, then drawing and binding 1 new card to your weapon. , used for acquiring Relics and
activating certain abilities.
, used for acquiring Relics and
activating certain abilities. to keep Attack cards.